Friday, September 9, 2016

Fun with Color: A Review of “Professional Yarn Dyeing at Home” by Sarah Eyre on Craftsy.com


There’s something pretty magical about dyeing your own yarn. It might be the vast array of color combinations to choose from, or the undeniable awesomeness that is working with your hands to create your very own skein of yarn. Whether you are a beginner who is looking to dive head in to a detailed, instructional journey, or an advanced dyer looking to learn new tips and tricks, “Professional Yarn Dyeing at Home” instructed by Sarah Eyre, will stimulate and educate. Sarah Eyre, a professional yarn dyer, artist and designer, leads you through 6 articulate and organized HD video lessons that includes a complete section on gathering materials all the way through to how to store and work with your finished yarn.

In the first lesson, “Getting Ready to Dye,” Sarah offers a calming and engaging introduction followed by a show-and-tell of materials and how to set up your very own dye studio. In this lesson we learn about the types of yarn, dyes, and mordant that bring the dye process to life. Lesson 2 jumps right in as Sarah safely illustrates how to dye, wash, and rinse solid yarns. Sarah is personable; easy to understand and beams with passion for the art that she creates. She moves on to teach us about dyeing wool/silk blends, semi-solids, and color mixing. Sarah also introduces her students to the popular technique of dyeing speckled yarns, which I successfully followed along with! In addition to teaching us about a slow cooker option for dyeing (time to dig out grandma’s vintage crockpot!), Sarah also includes a wonderful section on letting go of perfection, a lesson that can be applied to many scenarios in our busy lives!

For crafters who want to learn even more technique, Sarah teaches about variegated yarns and how to create complex colorways. She reminds us that keeping records is a very important part of dyeing, especially for those wanting to re-create some of their amazing colorways. In her final lesson, we learn the best way to dry our newly dyed yarns and how to skein and store them properly. Sarah offers a lovely piece on how to work with your hand dyed yarns and gives us some great tips (like using slip stitches in your project!). Sarah’s rich knowledge and experience in the fiber arts sphere is just what we needed to inspire us to dye our own, unique yarns.

And I was indeed inspired! Once I took my time to collect the correct materials for the class, I was able to begin my journey. I had dyed yarn before, but considered myself a step above a novice, and fell into a comfortable flow during the lessons. Sarah’s instruction and confidence was bewitching! I jumped in with both feet (or more appropriately, both skeins) and followed along with her instruction from Lesson 4, Chapter 2: “Dyeing Speckled Yarn.” The process was fun and action-packed (my tiny kitchen added an element of difficulty, but thanks to Sarah I was able to plan ahead to maximize my space!). Sprinkling the dye onto the yarn was super fun, and although washing and rinsing was messy, it was enjoyable to watch the yarn transform. I probably stared at my freshly dyed yarn more than I should admit; even through it’s drying process. The results took my breath away! I did it! And you can too.

My post-speckle yarn bath!
Voila! My hand dyed yarn which I named, "Lady in the Water."
As someone who was brand new to classes on Craftsy, the comprehensive HD videos, complete with an itemized table of contents are great and very easy to follow along with. The lessons are broken down into chapters and Craftsy gives you the option to start and stop videos and comment/ask questions throughout the creative process with their virtual classroom. Sarah is prompt and thorough at responding to questions and inquiry, and truly cares about her students and their work. Plus, your access never expires so you can go back and watch it over and over, all while trying new dyeing techniques. I greatly enjoyed this class and highly recommend it to all fiber artists. Generously priced at $29.99, this class is bursting with easy-to-follow material and creative inspiration from a top-notch instructor. Craftsy also offers the option of purchasing this class as a gift, and with the holidays upon us, this would make a wonderful gift for the crafter in your life. It’s time to roll up your sleeves, have some fun with color, and create your very own yarn!   -Wanda Calamia


Sarah Eyre’s “Professional Yarn Dyeing at Home” class can be found on Craftsy HERE.

Monday, June 27, 2016

My Fatty Manifesto of Sorts

Newsflash: I am fat.

I am also very happy with my body. For I am strength, resiliency, and finally capable of self-love.

But I am living in a society that is filled with people who would rather fat shame women than own up to their own insecurities. If you are not attracted to my fatness, keep on walking. Just because something doesn't appeal to you doesn't mean that you have to tear it down; just because your favorite porn star puts on weight doesn't mean she is useless. Weight changes like the weather, and fat people will always be beautiful and worthy of love.

Newsflash: making overweight people feel bad about their bodies isn't going to motivate them to lose weight.

Fat shaming DOES make people feel bad about themselves and may cause them to gain more weight; so who's the bully here?

I am fat, and I am worthy of love.

In 1995 I went on an all Jello diet to try and lose weight because I was shamed for being a fat kid. I ate one Jello cup a day for 2 months straight. I was 15.

It saddens me that over 20 years later, we are still living in an image-conscious society where women are held to an impossible (and often dangerous) ideal. But you don't have to subscribe to the bullshit.

Because there will always be fat shamers and even women who live in a cyclone of constant comparison. Find your fat tribe, your homies, true and genuine souls who don't care what size jeans you wear.

Embrace your curves, your rolls, your plump tufts of womanly goodness; be happy in your skin.

YOU are worthy of love.

/rant.


Wednesday, April 13, 2016

It's been a year

My mother was complex; beautifully flawed and undeniably sad.
She was the wilted flower trying to heal, but got lost in the shade. Sometimes I can still smell her. And the way the cigarette smoke smelled on her skin, and the rose scented candles she loved to burn.
My mother was a survivor. She was filled with her own madness and sadness but even I will never know what it's like to lose a younger sister at the hands of another. She was a survivor. 
She was one of the lucky ones. One that got away, to breathe the fresh country air. To live with the promise of a new day while carrying the heavy, cemented pain of the city that broke her.
My mother had no clue how to love me. Or any of us. Although she tried.
I never saw her cry; not until the day Papa died. Her strength puddled like her tears, and I loved her for that. I loved her even when I didn't know who she was.
My mother pushed me away. Over and over. A child begging for love. But she kept the picture of the horse I drew for her when I was a child, until the day she died. 
My mother was too young to get sick. But it was more than that. It was the pain she carried with her through the seasons of her life. But still, she was a survivor. Until she wasn't anymore. 
My mother nurtured her houseplants and loved her cat. She loved hanging photographs on the wall.
I miss her. Everyday.
My mother died a year ago today. She was 50. 
My mother was complex; and so am I. Beautifully flawed and undeniably sad.

Sunday, February 21, 2016

Take this with you today

We are all soldiers of life. Everyday we put on our armor and brace for impact; for there will always be someone out there hell bent on discrediting you. Be brave, speak your truth, and never let the man get ya down.

Monday, December 14, 2015

On the Disappearance of Girl Power

Far too often, the bond of sisterhood is called into question by those who wish to take reign; a new society of feminism has inadvertently positioned us against each other as the realm of politics and self-determination collide. As women, we fight on a daily basis to secure all of our very important needs whilst working to accomplish our goals. More so than ever, I feel like we as women are called to action - to lead with our character and integrity and cast aside the petty dramatics forced upon us by those who wish to see us fail. These are tough times, indeed, yet we all still wish for our own special moment in the sun. However, this diminishing notion of sisterhood has been plummeted by our own selfish desires to succeed above others, and instead of embracing vulnerability we have blatantly rejected it. To live with an open heart is difficult, albeit not impossible. The old adage that "we should build each other up instead of tearing each other down" couldn't be more relevant; especially in a cultural climate where feeling threatened by other women is not only detrimental, but commonplace. While I do believe that strong women empower each other, I also believe that we can only meet people as deeply as we've met ourselves. Hence, our journey is an ever-evolving cycle of self-awareness and perseverance. I feel honored to have encountered many strong and empowered women along my journey who have taught me to never stop believing and to never stop achieving...and to carry that message to other women, struggling or not. And to those we may encounter who feel jealous, threatened, or drenched with fear, we can only offer two things; our hand and our heart. The rest is up to them.


Saturday, February 23, 2013

Recipes that Rock: How to Make Vagina Cupcakes

Okay, so I know that many of you out there are thinking: 'Omg! Why would you make those?' Well, setting aside my eccentrically loud sense of humor, I set out on this endeavor with a purpose. I was making them for my knit group's 'Fuck Valentine's Day' party/potluck.

After all, knitters love vagina! Right?

As I set out on my journey with nothing but an idea and Google, I found out that although realistic, fondant cupcakes were out of the question. I appreciate some good fondant, but I didn't have the time to get that creative with the vagina, giggety.

There weren't that many helpful tutorials, so I set out to wing in. Basically the first step was acquiring the goods to at least make a basic cupcake. Head to the market and pick up a box of cake mix for whatever flavor strikes your fancy. I used a french vanilla mix, but you can use plain vanilla and then add some red food coloring for fun. Don't forget to read the box and get the ingredients needed! Many times I have forgotten the eggs, and some mixes require baking cups. Don't forget those!

Shopping list must-haves:
Before you check out, make sure that you have gathered your decorating supplies. You will need at least 2 base colors of frosting (I used white and pink) or you can get creative with white by adding your own food coloring. In addition to your main frosting, you will need some fun supplies to add artistic touches. This can include: cake gel, sugar pearls (beads), sprinkles (especially chocolate), and fruit works great, too! Use your imagination; vaginas come in many shapes and sizes!

Cook your little cupcakes of doom to the recipe on the box and they should look something like this:


Don't have the money to buy pricey cupcake tins at the store? Here's a tip: check your local dollar store for some cheap tins that you can reuse. They aren't the best quality, but if you take care of them you can prevent rusting and voila! It's cheap!

Begin frosting your cupcakes with your base color of frosting. I used white, which was a creamy vanilla. If you cooled your cupcakes according to the instructions, they should be cool to the touch and slightly rounded at the top. Begin frosting your cupcake making sure to be as even and smooth as possible.


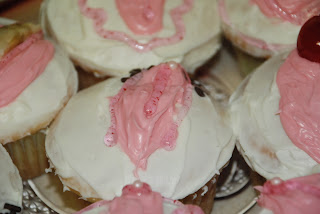
When all of your cupcakes have been frosted with a base, you can now add your first set of labia! This is the part of the process when your vaginas will begin to take some shape. With a small butter knife, begin frosting in a bean shape to the outline you want. I made some of my vaginas wider, and some were more narrow. Don't be afraid to really slap it on, the messier your lips, the more realistic it looks!


Once you have your two colors on your cupcake, you can begin to add glorious detail. Bedazzle your yoni cakes with edible glitter, gel frosting, or sprinkles! As you can see below, I used a combination of cake gel (with confetti in it) and sugar pearls for that "special" area of the cupcake. Ladies, you know what I'm talking about! So get creative with fruit if you wish, too! I used bananas and maraschino cherries but you can also use blueberries and strawberries (pretty much any berry). When your decorating is complete, be sure to refrigerate your vaginas, you don't want them to be melty.

Check out my vaginas:


 Oh la la!


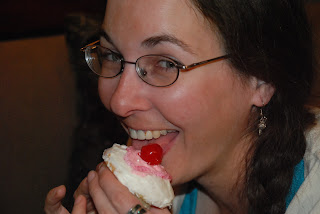
There were a blast to make! I do not consider myself a baker, but these were easy to make. The decorating portion took the longest amount of time, so allot yourself an extra hour to be on the safe side. Maybe someday I will be brave enough to make fondant vaginas, but for now, I am content with my little twats of goodness. More so, they were a total hit at the party. But wait, there's more! You get to take hilarious photos like these and then post them on the interwebz!


Special thanks to my friends and knitter homies Kellie Carr Piet (top) and Tiffany Newman (bottom) as they were willing and ready to dive into their sugary muffs of joy.

So go forth and make your very own vagina cupcakes! Then blog it! Or better yet, send me some pics of your creations and I will blog it! :)


No vaginas were harmed during the making of this project.


Wednesday, December 12, 2012

Iuli's Hat


This was a fantastic knit for my friend Iuli, who lives up in Seattle. It was my first time knitting this lovely pattern, and will knit again I am sure!


Our heads are the same size, so this will be a perfect fit!